
Quick Start Guide for Faculty
Adobe Connect is Northwestern University’s web conferencing software. In distance learning courses, Adobe Connect is used to host course meetings where students and faculty are online at the same time. Note that all faculty are required to host at least one Adobe Connect meeting. It is recommended that this meeting be in the first week of the course. Most faculty host between one and three meetings using Adobe Connect, though some choose to host more. Sync Sessions must be held on the day of the week and time listed in CAESAR and the SPS Web site. Attendance at sync sessions is never mandatory for students, and cannot be graded. All sessions need to be recorded and posted in the Canvas course site for students who could not attend the session to view.
Below is a list of skills that you’ll need to successfully conduct an Adobe Connect sync session. Please go through the checklist and ensure that you know how to perform each task. If there is something on the list that you don’t know about or need a refresher, you can find more information below the list.
- Log in to your Adobe Connect meeting room and begin the meeting
- Recover your forgotten password
- Provide your students with the information to attend the session
- Start the meeting audio and join the audio conference
- Record the meeting
- Post the recording
- Load files to share into the meeting room
- Share your computer screen
- Mute participants to reduce feedback
- Make your TA a meeting host
- Assist your students with VoIP (voice-over Internet protocol) audio issues
Below is a list of more advanced skills that you can use to engage with your students in Adobe Connect. If you are interested in learning any of these skills, please contact spsconnect@northwestern.edu.
- Share webcam video
- Allow your students to share webcam video
- Use the whiteboard and whiteboard overlays
- Share documents for downloading
- Share Web links
- Conduct a poll of your students
- Change the meeting layout
- Enable host and presenter only preparation areas
- Allow your students to share files or their computer screen
Start the meeting
From Canvas: Click on the link in the left-hand navigation menu. Enter your Northwestern e-mail address (as your login) and your password. Follow the linked instructions to add your meeting room link to the left-hand navigation menu.
And follow these instructions to edit an existing link in your Canvas course menu.
From a Web browser: Navigate to http://nwuniversity.adobeconnect.com. Enter your Northwestern e-mail address (as your login) and your password. Click on the “Meetings” item in the gray menu bar at the top of the screen. Click on the meeting title you wish to attend from the list of meetings. Click on the URL (http://nwuniversity.adobeconnect.com/….) listed to open the meeting room.
Recover your forgotten password
Navigate to http://nwuniversity.adobeconnect.com and click the “Forgot your password?” link. A link to reset your password will be e-mailed to you. If you don’t receive the link, make sure to check your Spam or Bulk Mail box.
 You can also e-mail spsconnect@northwestern.edu or call 312-503-3333 and select option 4. We will send you a link to reset your password. Note that email and calls received will be processed during normal business hours.
Provide your students with the information to attend the session
Your students will receive their log-in name and password via e-mail. They should receive this information around the time that course sites open (2 weeks prior to the official start of the course), but may receive it later depending on when they register for the course. Student log-in is their NU e-mail address, and password is the term and year of the course (ex. “Spring2015”).
You are responsible for telling your students:
- The date and time of each sync session
- The direct link to your Adobe Connect meeting room
- That the sync session is not mandatory and will be recorded for later viewing if they cannot attend.
- How to log in as a guest to the session if their password doesn’t work.
Post this information in an announcement with e-mail to all for your students. Below is a sample announcement:
“Class, I will hold our first live session [fill in date and time] central time. This session is optional and it will be recorded, but your attendance is highly encouraged so you can ask questions. If you cannot attend, please feel free to post any questions you have to the Q&A discussion board or email them to me. Also, be sure to review the recorded session. We will be utilizing Adobe Connect, a web conferencing software, to conduct the session. While you can access the link from the left-hand navigation menu in Canvas, you can also directly access the session by clicking on this link: [insert link]. Feel free to bookmark/save this link for future use as all sync sessions in this class during this term will utilize this same link. You should have received your Adobe Connect login and password information via e-mail. Please note that your Adobe Connect login is your NU email address and not your NetID. If you cannot remember your password, please use the “forgot password” link on the login page – make sure to check your “spam” box if you don’t receive an e-mail from the system. If you have trouble with your login, please select the “Guest” radio button option and type your name. I will be able to see you wish to enter the room and will let you in (in might take a few moments so please be patient). After the session, you can email scsconnect@northwestern.edu to obtain your login and password. The audio portion of the call will be handled via teleconference. Once you are in the session, a dialog box will appear that asks you to input the phone number you’d like to be called at. Simply enter your phone number and the system will call you at that number. If you wish, you may also use your computer headset for audio. We have found a few more technical issues with this, but it is an option for you. If you experience issues with the dial-out feature or headset audio, you can always dial into the conference. The dial-in information will appear in the dialog box, but if you accidentally close it, you can access the meeting’s dial-in information by clicking the blue “I” icon at the top right of the meeting. If you have any questions, please let me know.”
Start the meeting audio and join the audio conference
Each Adobe Connect meeting room is equipped with integrated VoIP and teleconference audio. We recommend allowing students to use either VoIP or teleconference, but what type of audio you use is your decision so long as the audio is clear to all students and on the recording.
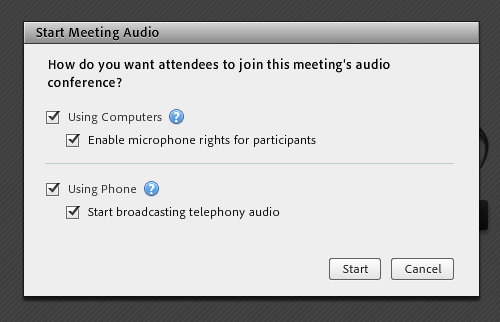
The meeting audio should start automatically when you open your Adobe Connect room. If it doesn’t you can manually start the audio conference. From inside your Adobe Connect meeting room, select the Audio menu on the top left side of the screen and then select “Start Meeting Audio.”

A dialogue box will appear. Leave all of the boxes that are checked as such. Click “Start.”
 After you click “Start” a pop-up window will appear with three options for joining the audio conference. If you wish to join the conference via telephone, we suggest using the dial-out feature. Enter your phone number, matching the format of the example number provided by the system, and click “Join.” The system will call you.
 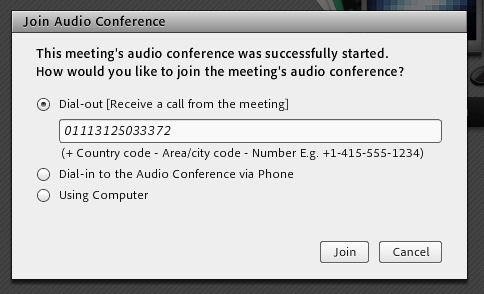 To dial in to the conference, select the second radio button, “Dial-in to the Audio Conference via Phone.” The teleconference information will appear, and you can use your phone to dial in.
 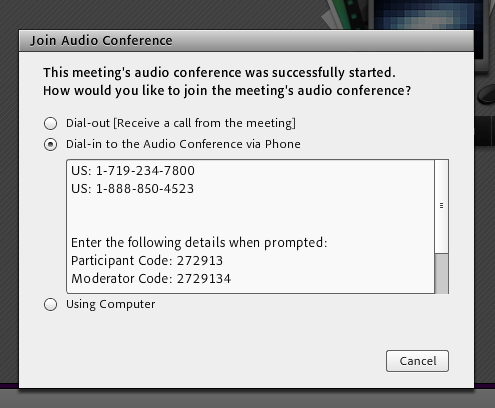 You can also connect via computer using VoIP audio. If you choose VoIP audio, we recommend a headset. To connect using VoIP, select the third radio button and click “Join.” If you experience any audio issues while connected via VoIP, go to the “Meeting” menu and select the “Audio Setup Wizard.”
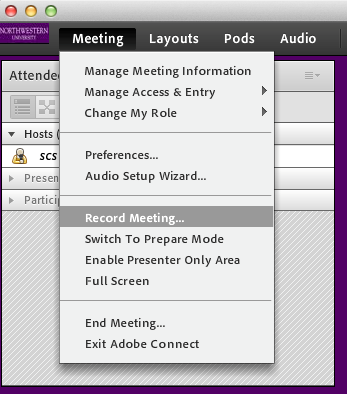
Record the meeting
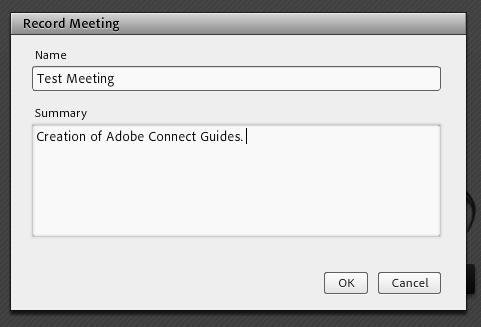
From inside your Adobe Connect meeting room, select the Meeting menu on the top left side of the screen and then select “Record Meeting.” Give the meeting a descriptive name including the term and section number (ex. Syllabus Overview, Winter 2015 – Section 57). Click OK. A red dot will appear in the upper right area of Adobe Connect to let you and students know the meeting is being recorded. We suggest you engage students to help you remember to record your session by letting them know to look for the red dot and remind you to start the recording if they do not see it.
Posting the recording
To access the recording of your meeting, select “Manage Meeting Information” from the Meeting menu. This will open a new web browser window. On this window, select “Recordings.” In the list that appears, click on the title of your recording, then copy the URL next to “URL for Viewing.” You can send this URL to students via announcement, or post anywhere else in your Canvas site, as long as you alert students to where you’ve posted it.
Load files to share into the meeting room
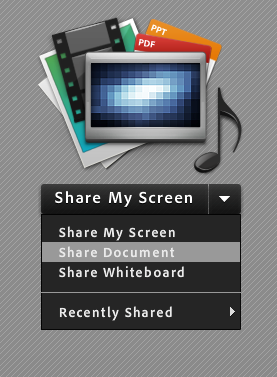
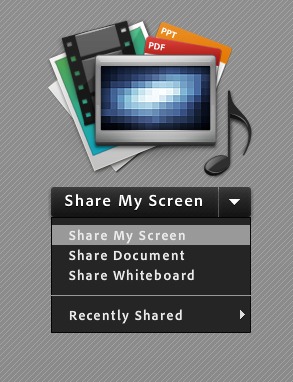
If you don’t already see a large, gray box with a screen, filmstrip, and music note graphic in the middle, select the Pods menu on the top left side of the screen. Then select “Share” and then “Add new Share.” Under the graphic in the middle of the gray box, select the downward arrow, then select “Share Document” from the pull-down menu. Click “Browse My Computer” and select the document you wish to share from your computer.
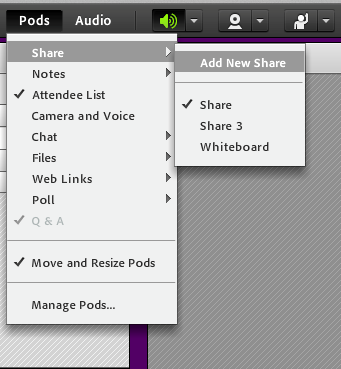
Share your computer screen
If you don’t already see a large, gray box with a screen, filmstrip, and music note graphic in the middle, select the Pods menu on the top left side of the screen. Then select “Share” and then “Add new Share.” Under the graphic in the middle of the gray box, select the downward arrow, then select “Share My Screen” from the pull-down menu. You’ll be asked to select Desktop, Applications, or Windows:
- Desktop: Shares your entire desktop. If you choose this option, make sure you turn off your e-mail notifications or instant messaging service. Student will be able to see all items appearing on your desktop.
- Applications: Shares all of the windows in one application, such as your internet browser or Microsoft Word. You will need to have the application you wish to share already running so it can be selected from the menu.
- Windows: Shares only the window you select. You will need to have the window you wish to share available and minimized so it can be selected from the menu.
Make your TA a meeting host
To make your TA a host of one meeting, hover your cursor over their name in the Attendee List at the top left of the meeting room and select “Make Host.” This will make the TA a host in the current meeting only, and you will need to make them a host again in subsequent meetings. Meeting hosts are able to edit the meeting, control the meeting audio, control any shared documents, and add or delete pods. Students and TAs are automatically logged into the meeting as participants, which allows them to view shared documents and participate in the chat and audio conference. To request permanent host access for your TA during the term, which allows them to start and run the meeting on their own, e-mail spsconnect@northwestern.edu.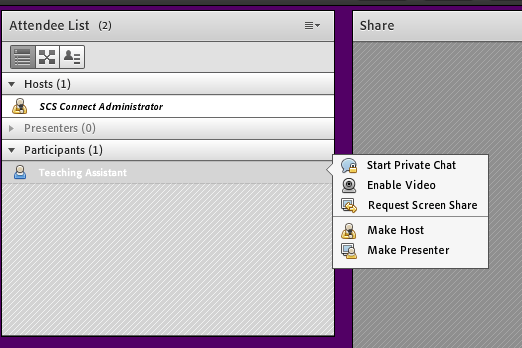
Assist your students with VoIP audio issues
If any of your students are experiencing difficulty hearing or speaking in the meeting, instruct them to go to the Meeting menu at the top left of the screen and select “Audio Setup Wizard.” They should follow the instructions on the Wizard. If you decide to use a headset and VoIP for your audio, please run “Audio Setup Wizard” as well.If you are experiencing audio feedback or background noise in the meeting, please instruct your students to mute their microphones or telephones when they are not speaking. While connected to the teleconference, students can mute their telephones by dialing *6 or using the mute button on the phone.